Drop-downs are one of the most useful features in MS Excel. It can help users select a choice instead of manually entering them. This can help you avoid human errors and validate data.
If you have a drop-down list in your spreadsheet, you might want to edit it at some point. The good news is that you can quickly edit your drop-down in Excel using several methods.
4 Methods of editing drop-downs in MS Excel
- Editing a drop-down manually using data validation
- Editing a drop-down list using ranges in data validation
- Editing a drop-down using a table and data validation
- Editing a drop-down using the OFFSET formula in data validation
Let us begin.
Method #1: Editing a Drop-down Manually Using Data Validation
If you’ve created a drop-down using Data Validation’s List, you can use this method to edit your drop-down.
Step #1: Open your Excel
Open your Excel workbook with the drop-down you need to edit. In our example, let’s use a drop-down containing programming languages. The goal is to add another language called C++ to this existing drop-down.

Step #2: Select the cell with the drop-down to be edited
Select the cell with the drop-down. In this instance, the cell is B1. You can see the selected cell in the Name Box.

Step #3: Select ‘Data Validation’
Click on the Data tab in the top menu bar. Now select Data Validation from the ribbon.
From the options that appears, select Data Validation again.

Step #4: Make changes to your drop-down list
Once you see the Data Validation dialog box, under the Settings tab, select List from the drop-down menu.
Now enter the added entry in the source text field. If you want to remove an existing entry, you can just delete it.

Step #5: Click OK
After you edit the entries, click on the OK button.

You can now see the entry in your drop-down list.

Method #2: Editing a Drop-down List Using Ranges in Data Validation
If you used a range of cells as your list in data validation, you can use this method to edit it.
Step #1: Edit the values in the cells
Make your changes in the cells that have the drop-down values. Here the values are present in column I.

For example, let’s add another value called Verified in the drop-down list.

Step #2: Select ‘Data Validation’
Go to the Data tab in the main menu bar.
Click on Data Validation. Select Data Validation again from the drop-down list.

Step #3: Edit the range of cells if there are any changes
Once you see the Data Validation dialog box, under the Settings tab, select List from the drop-down menu.
In the Source: field, you will see the range here. However, it only includes the first two rows and not the newly added entry in the third row.
To change this, you click on the arrow in the block to the right of the Source: field.
The window will now minimize, and you will see your spreadsheet again.

Step #4: Select the options from the cells
Click and drag your cursor across the cells you want to include in your range.
It will automatically update the cell range in the source text field.

Step #5: Click OK
After you’re done, click the OK button. You will now see Verified in the drop-down list.

Method #3: Editing a Drop-down Using a Table and Data Validation
If you’ve used a table to create a drop-down, you can edit the drop-down list by simply editing the table.
Step #1: Select ‘Data Validation’ and check the source
In our example, we have a drop-down list called Favorite Language.

Click on the cell that displays the drop-down list, in our example that would be E1.

Go to the Data tab in the main menu bar.
Click on Data Validation. Select Data Validation again from the drop-down list.
In the Data Validation dialog box, you must check if the table has been linked to the source. If not, you can do so by inserting the following formula in the source text field:
=INDIRECT(“TableName[HeaderName]”)

Step #2: Edit the table
Now that you’ve checked that the table is linked, all you have to do is edit your table.
This would automatically update your drop-down. For this example, let’s remove Swift from the table by deleting that row.

Step #3: Check your edited drop-down
This would automatically edit your drop-down according to your table. Click on the drop-down and verify if the change is reflected.

Method #4: Editing a Drop-down Using the Offset OFFSET Formula
When you reference a range of cells, you can’t add another value dynamically. This is because it only takes into consideration the range of cells you entered at the start. This is the method to use if you need to regularly add values dynamically.
Step #1: Select ‘Data Validation’
Click on the cell with the drop-down list. In our example, it is F1.

Go to the Data tab in the main menu bar.
Click on Data Validation. Select Data Validation again from the drop-down list.

Step #2: Remove cell range and insert OFFSET formula
Once you see the Data Validation dialog box, you can see the range in the Source text field.

Delete it.

Enter the formula =OFFSET($I$1,0,0,COUNTA($I:$I),1) in the Source text field.
The OFFSET formula contains five arguments or parameters.
- The first argument represents the cell reference of the first value. Here, it’s I1 and relatively written as $I$1.
- The second argument is the number of rows to offset.
- The third argument is the number of columns to offset.
- The fourth argument counts the values in the specified column. Here, it’s column I. This automatically excludes empty cells and counts the ones with values in them.
- The last one is the width.
Step #3: Click OK
Once you enter the formula in the Source text field, click on the OK button.

You can see the values in a drop-down just like before.

However, now when you add values in the column, you don’t have to keep updating the value in the Data Validation dialog box. The OFFSET formula updates it for you. For instance, let’s add the value Delivered.
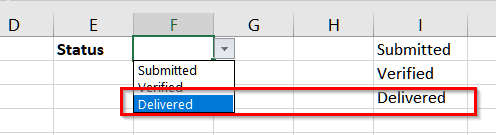
As you can see, it was updated immediately with no manual work from your side.
The Bottom Line
You don’t have to struggle to edit your drop-downs anymore. Here are four quick methods to edit your drop-downs with ease!