If you use Microsoft Word and love the word art feature, you might wonder if you can use it on Google Docs as well.
Here’s the good news: you can! Word Art is a quick and easy way to add flair to your document and make it much more interesting.
2 methods of inserting Word Art in Google Docs
- Using the Insert and Drawing option
- Using the Help and Drawing option
We will explain how to apply either method in a few simple steps.
Let us begin!
Method #1: Using the Insert and Drawing Option
This method is useful if you are comfortable and used to accessing various functions using the main menu bar.
Step 1: Open your Google doc
Step 2: Create a new drawing
- In the menu bar on top, you will find the Insert option.
- Click on it and select Drawing from the dropdown.
- Now, click on + New.

- This would open the Drawing dialog box.

Step 3: Go to Actions and select Word Art
- In the Drawing dialog box at the top, click on ‘Actions’.
- Select Word art from the dropdown options.

Step 3: Enter the word and save it
- A text box will open in which you can type.

- Type the word you want to have as Word Ard in the text box and hit Enter on your keyboard.

- Next, click on the Save and Close button in the top right corner, to close the Drawing dialog box.
- Once you save it, you will see the Word Art inserted in your document.

Step 4: Format the Word Art Text
- If you wish to change the style and format of the word, you just double-click on the word art itself.
- This would re-open the Drawing dialog box. Click on the word again to see the different styling options.

- You have several options to style the word.
- You can change the color, the border color, the border style, the size of the border, the font, etc.
- For this example, let’s change the color to red.

- Click on the Save and Close button in the top right corner, to close the Drawing dialog box once you’re done making the style changes.
- You can now see the changes reflected in the Word Art in your document.

Method #2: Using the Help and Drawing Option
This method is useful if you are not familiar with the main menu bar and want to use the easy access provided by a search bar.
Step 1: Open your Google doc
Step 2: Go to the Help section
- In the main menu bar, click on Help.
- Alternatively, you can also use the keyboard shortcut Ctrl+/ to open the Help section.
Ctrl+/ 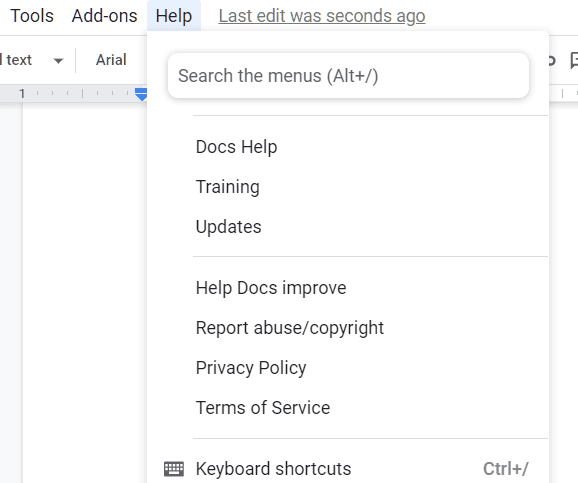
Step 3: Click on Insert drawing
- In the search field at the top of this dropdown menu, type the word ‘drawing’. As you type, several related options will appear.
- Select the option + Insert drawing.
- This would open the Drawing dialog Box.

Step 4: Go to Actions and select Word Art
- In the Drawing dialog box at the top, click on ‘Actions’.
- Select Word art from the dropdown options.

Step 5: Type in the word and save it
- Type the word you want to have as Word Ard in the text box and hit Enter on your keyboard.
- Next, click on the Save and Close button in the top right corner, to close the Drawing dialog box.
- Once you save it, you will see the Word Art inserted in your document.


The Bottom Line
You don’t have to wonder how to insert word art in your Google Docs anymore, nor do you have to struggle to insert it.
Using these two quick and easy methods, you can insert word art into your document in a flash, whenever you like!