In general, a label is a sticker with something written on it. People place such stickers with printed information such as addresses on envelopes.
Your label may have one of two addresses—the recipient’s address or the sender’s address. Microsoft Word allows you to create and print such labels.
Here, we will explain the steps necessary for creating and printing labels in Word.
Step #1: Open a Blank Document in Word.
Open Word, and click on New on the left side. The right side shows the icon of a new blank document—click on it to open a new blank document.

Step #2: Open the Envelopes and Labels Dialog
Click on Mailings in the top menu bar, and the ribbon changes to show the mailing menus. Click on Labels to open the Envelopes and Labels dialog.

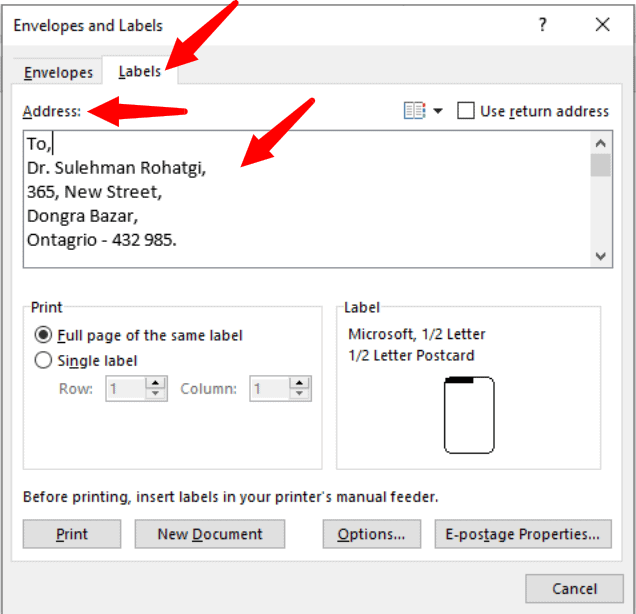
Step #3: Set Up Recipient/Sender Labels
Within the Envelopes and Labels dialog, click on the Labels tab.
Under Address, you can type in either the recipient’s address or the sender’s address within the box.
If you have created envelopes earlier, and would like to use the return address (sender’s address) already in your system, click on Use return address and ensure a tick-mark is present within the square box immediately on the left. Word will fill the return address in the Address box. If you do not have a return address in your system, type in the return address.

Step #4: Set Up Number of Prints
Once you are satisfied with the address entry, and want to print only one label on the entire page, click on Full page of the same label under the Print section.
If you want to print several labels on one page, click on Single label and select the number of rows and columns necessary.

Step #5: Set Up Paper Size
Here are some tips to customize and get maximum out of printing labels. :
- Click on Options to open the Label Options dialog. Under Printer Information, you can select the type of printer—Continuous-feed or Page Printers—and the type of Tray for the Page printers.
- Several vendors supply sticky papers for printing labels on, and you may select from the Label vendors list—click on the down arrow on the right of Label vendors, and click on the vendor of your choice.
- Depending on the vendor you have selected, you can choose from their list of products under Product number.
- Here, you are selecting the size of the paper on which you want to print the labels. For a specific product number, its related information appears on the right side under Label information.
- For additional settings, click on the Details tab to display the various measurements for printing the label.
- You can adjust the settings to your preference. Word also allows you to define your own measurements, for which you must click on New Label.
- Once you are satisfied with the settings, click on OK to exit the dialog. Word will return you to the Envelopes and Labels dialog.

Step #6: Print the Label
Ensure label papers are in your printer and the printer is turned on. Click on Print to start printing your labels.

Conclusion
A neatly printed address label looks good on an envelope and helps prevent wrong delivery. With Word, you can create and print professional-looking labels. Follow our seven-step method to make your task easier.