Sometimes it is necessary to add images in a Word document to display several points concisely. Adding arrows with different shapes, sizes, and directions pointing to the specific point in the image serves to further emphasize each point.
Word allows you to insert / draw many types of arrows:
- Keyboard arrows
- Arrows by Unicode
- Arrows as symbols
- Line arrows
- Block, curved, and connector arrows
Depending on your requirement you can use any or all of them in your document. We provide you step-by-step instructions here.
Method #1: Insert Keyboard Arrows
Step #1: Open a Word Document
Open the Word Document in which you want to insert arrows. Place your cursor at the position where the arrow should appear.
Step #2: Insert keyboard arrows
- Type two Hyphens and a More Than sign to insert a Right arrow.
- Type a Less Than sign and two Hyphens to insert a Left arrow.
- Type two Equal signs and a More Than sign to insert a Bold Right arrow
- Type a Less Than sign and two Equal signs to insert a Bold Left arrow
- Type a Less Than sign, one Equal sign, and a More Than sign to insert a Double arrow.
This is how the arrows look.

Method #2: Insert Arrows by Unicode
Step #1: Open a Word Document
Open the Word Document in which you want to insert arrows. Place your cursor at the position where the arrow should appear.
Step #2: Insert unicodes for arrows
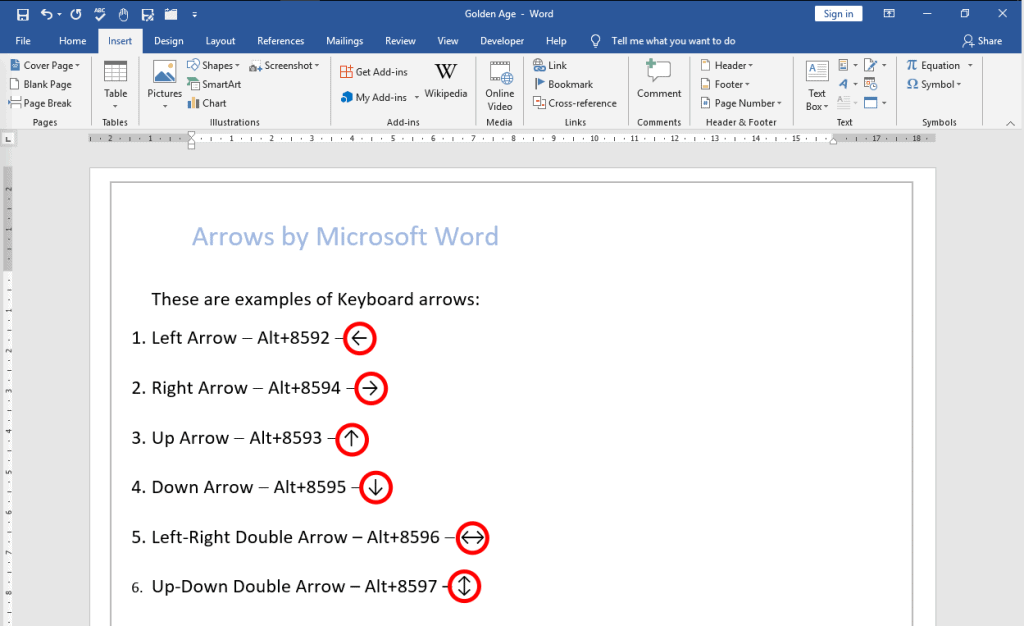
Hold down the Alt key on your keyboard and type the following numbers on the numeric keypad. Release the Alt key only after you have finished typing the complete string. Follow the table for the type of arrow you want to insert.
| Arrow Type | Alt+Unicode (on numerical keypad) |
| Left Arrow | Alt+8592 |
| Right Arrow | Alt+8594 |
| Up Arrow | Alt+8593 |
| Down Arrow | Alt+8595 |
| Left-Right Double Arrow | Alt+8596 |
| Up-Down Double Arrow | Alt+8597 |
This is how the arrows look.
Method #3: Insert Arrows as symbols
Step #1: Open a Word Document
Open the Word Document in which you want to insert arrows. Place your cursor at the position where you want the arrow to appear.

Step #2: Open the Symbols Table
Click on the Insert tab on the top menu bar to change the ribbon. In the Symbols section, click on Symbols, and then on More Symbols to open the Symbols Table.

Step #3: Select and insert the Symbol
Scroll up and down to see various symbols, and click on the one you want to insert. Click on the Insert tab to insert the symbol and then click on the Close tab to close the table. This is how your document will look.

Method #4: Insert Line Arrows
Step #1: Open a Word Document
Open the Word Document in which you want to insert line arrows.

Step #2: Select the Shape
Click on the Insert tab on the top menu bar to change the ribbon. In the Illustrations section, click on Shapes to open the choice of Shapes.

Under Lines, click on the second shape from the left. If you prefer, select any other line shape instead. Word closes the choice of Shapes and changes the cursor to a cross.

Step #3: Draw the arrow
Move the cursor to the position where you want the tail of the arrow to be, hold down the left mouse button and drag the mouse and the cross to where you want the arrow to point. Word will insert the arrow, and when you release the mouse button, will place the arrow.

Step #4: Modify the arrow
Notice that the ribbon has changed and Word has opened the Format tab under Drawing Tools. The section Shape Styles allows changing the shape of the arrow such as:
- Style
- Outline
- Effects
- Shape
Style — Click on the downward arrow on the right of Subtle Shapes [1] to open the Theme Styles and Presets choice. Proceed from Step #5.
Outline — Click on the small triangle on the right of Shape Outline [2] to open the Theme Colors dialog. Proceed from Step #6.
Effects — Click on the small triangle on the right of Shape Effects [3] to open the Effects selection. Proceed from Step #7.
Shape — Click on the small triangle at the bottom right of Shape Styles section [4] to open the Format Shape dialog. Proceed from Step #8.
Step #5: Change the style of the arrow

In the Theme Styles and Presets choice, Word offers some preset styles. Click on the one you like best, and the arrow will change accordingly.
Step #6: Change the outline of the arrow
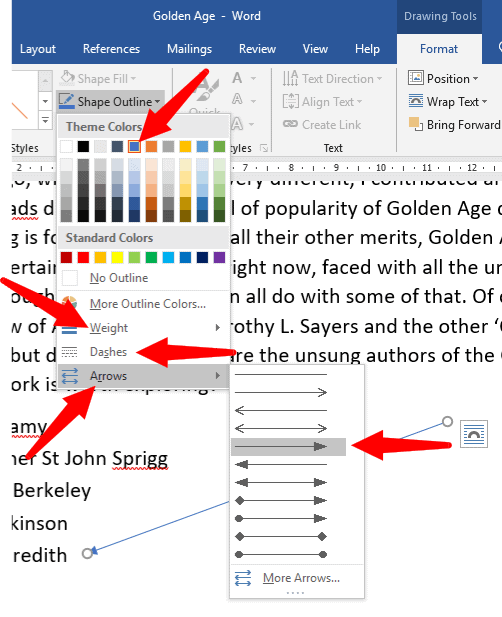
In the Theme Colors dialog, Word allows you to change many features of your arrow:
- Color
- Weight
- Dashes
- Arrow
You can change the color of the arrow, weight (thickness) of the arrow, Dashes (solid line or dotted) of the arrow, and Arrows (type of the arrow head). Simply hover the mouse pointer over the tabs—Weight, Dashes, and Arrow—to see the choices available. Click on the choice you like.
Step #7: Change the shape effects of the arrow

The Effects selection allows introduction of different effects on the arrow. The selection offers several effects such as:
- Preset
- Shadow
- Reflection
- Glow
- Soft Edges
- Bevel
- 3-D Rotation
Simply hovering the mouse pointer over the choices will show the various choices available, and you can pick anything you like. Word will store your choice in Preset on the top.
Step #8: Change the Shape of the arrow

The Format Shape dialog offers three choices:
- Fill and Line
- Effects
- Layout and Properties
Fill and Line — You can select various fill and line properties for the arrow.
Effects — Offers the same choices as in Step #7.
Layout and Properties — This dialog allows you to assign a Title to your arrow and give it a description.
Once you have made your choice, click on the cross to close the dialog.
Your arrow may look like this

Method #5: Insert Block, Curved, and Connector arrows
Step #1: Open a Word Document
Open the Word Document in which you want to insert arrows.

Step #2: Select the Shape
Click on the Insert tab on the top menu bar to change the ribbon. In the Illustrations section, click on Shapes to open the choice of Shapes.

Under Block Arrows, select the type of arrow you need. Word will display the name of the arrow when you hover the mouse pointer over it. Click on the arrow you prefer, and Word will close the dialog, and change the mouse pointer to a cross.

Step #3: Insert the arrow
Position the cross where you want the arrow to start, and holding down the left mouse button, drag the cross to where you want the arrow to end.

Notice that Word has changed the ribbon to include a Format tab under Drawing Tools.
Step #4: Modify the arrow
You can change the position and shape of the arrow by clicking and dragging the appropriate circles around it. You can rotate the arrow in 3-D by clicking and dragging the circular handle on its top.
For modifying the arrow further, follow Method #4, Step #4 onwards.
Finally, your arrow may look like this.

Conclusion
You can add many types of arrows to beautify and emphasize your Word document. Although the process looks involved with too many steps, following our instructions above should make the task easier.
It was really useful thanks
Hi,
Your table is incorrect, right arrow is actually Alt+8594.
So just a typo.
Thanks