When writing in Microsoft Word, we place spaces (using the space-bar on the keyboard) between words to make the sentence more readable. When we type a sentence, Word treats a space as a character and uses the space between words to decide where to fold the sentence and continue it on the next line when the sentence gets longer than the line length specified by the page size.
For instance consider the two sentences within a finite boundary defining the line length:

As the length of the first sentence is shorter than the line length, Word is not folding the sentence. However, the second sentence is longer, and Word is folding it using the space between the words Very and Lightly.
For some reason, such as for clarity, we may want Word to retain the two words Very and Lightly on the same line rather than separating them as above. The sentence would then look like:

This requires replacing the regular space present between the words Very and Lightly with a non-breaking space. Such non-breaking spaces are also known as nonbreaking spaces or no-break spaces. Word recognizes non-breaking spaces and treats any two words cojoined by a non-breaking space as a single entity.
We will explain how to let Word insert a non-breaking space in a sentence where it is necessary. You can do this in two ways:
- Using Keyboard Short-Cuts to Introduce Non-Breaking Space
- Using Menus to Introduce Non-Breaking Space
Let’s start.
Method #1: Using Keyboard Short-Cuts to Introduce Non-Breaking Space
Step #1: Open a Word Document
Open a Word document containing the sentence where you want to introduce non-breaking space.
For instance, we would like to keep the words micro and controllers together, but Word has split them onto two lines.

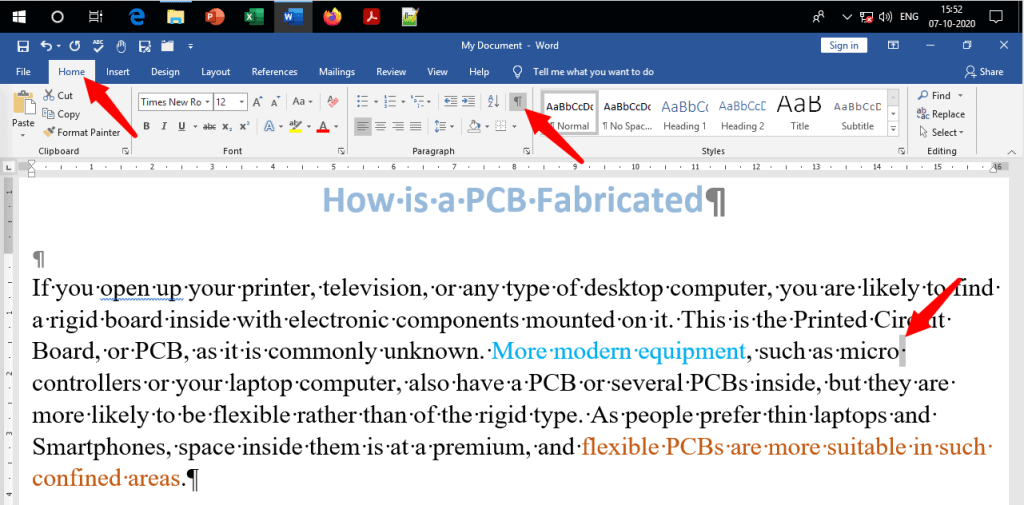
Step #2: Show Hidden Characters
Click on the Home tab on the menu bar on top. Next, click on the Show/Hide icon. This will reveal space and other characters between words that normally Word hides from view.
Note: Step #2 is only for instructional purposes. Once you have mastered the technique, you may skip this step.
Step #3: Insert Non-Breaking Space
Select the space between the words micro and controller (represented by the dot). On your keyboard, press the keys Ctrl, Shift, and Space together.
Note that the selected dot has now changed into a small circle—meaning Word has replaced the regular space with a non-breaking space.
Also note that the two words are no longer on two lines, but appear together on the same line.

Step #4: Hide Hidden Characters
You may repeat Step #3 at as many places in the sentence as necessary. Once you are satisfied, click on Show/Hide icon to revert to the regular view.

To remove the non-breaking space and revert to the regular space, select the non-breaking space and hit the space-bar once on your keyboard.
Method #2: Using Menus to Introduce Non-Breaking Space
Step #1: Open a Word Document
Open a Word document containing the sentence where you want to introduce non-breaking space. For instance, we would like to keep the words micro and controllers together, but Word has split them onto two lines.

Step #2: Show Hidden Characters
Click on the Home tab on the menu bar on top. Next, click on the Show/Hide icon. This will reveal space and other characters between words that normally Word hides from view.
Note: Step #2 is only for instructional purposes. Once you have mastered the technique, you may skip this step.

Step #3: Open Symbols Dialog
Select the space between the words micro and controller (represented by the dot). Click on the Insert tab in the top menu bar to change the ribbon. Then click on Symbol, and in the dialog that opens, click on More Symbols to open the Symbols Selection Dialog.

Step #4: Insert Non-Breaking Space
In the Symbols Selection Dialog, click on the Special Characters tab [1]. Scroll down to Non-breaking Space [2]. Click on Insert [3]. Word will insert the non-breaking space (represented by a small circle) in place of the regular space and place the two words micro and controller on the same line. Close the dialog by clicking on Cancel [4].

Step #5: Hide Hidden Characters
You may repeat Step #4 at as many places in the sentence as necessary. Once you are satisfied, click on Show/Hide icon to revert to the regular view.

Conclusion
Word uses several types of spaces to format sentences. We have discussed two methods of using the non-breaking space to replace a regular space to make the sentence more readable. Use the method you find most suitable.