
6 Ways to Lock an Image in MS Word
- Lock an Image Using Picture Anchor Tool
- Lock an Image Using Picture Content Tool
- Lock an Image Using Restrict Editing Option
- Lock an Image Using Watermark Tool
- Lock an Image Using Fill Effects
- Lock an Image Using Header and Footer
Method 1: Lock an Image Using Picture Anchor Tool
This method is the simplest way to lock an image into position. However, it is not as permanent a fix compared to the other methods. It simply allows you to edit your text while retaining the current arrangement of the image.
Step 1: Open an MS Word document.

Step 2: Insert an image.
Go to the Insert tab. Under the Illustrations group, click on Pictures.
Upon doing so, an Insert Picture dialog box will launch in the middle of your screen.
Locate the image you want to use from your drive and click Insert to proceed.

Step 3: Select the text wrapping style.
Right Click on the picture and select Wrap Text. Select the text wrapping style you want to use among the options that show except for In Line with Text. This style will make your image sit on the text line then automatically adjust once you type in or edit the main text.
For this example, we’ll be using the Behind Text style.

Step 4: Fix the position of the image.
Repeat the step to display the Wrap Text menus once more and select Fix Position on Page. Upon doing so, you will notice that an anchor with a lock icon will appear near the image. Now you can edit your text without being worried about moving the images around it.

Method 2: Lock an Image Using Picture Content Control
This method won’t just enable you to protect your image from being accidentally moved but also prevent it from being deleted by mistake.
Step 1: Open a Word file.

Step 2. Enable the Developer tab.
By default, the Developer tab is not visible. So, go to the File menu and click Options.


This will display the Word Options dialogue box. You should see a list of options on the left side of the window.
Click Customize Ribbon. Once you’ve done that, the dialogue box will display two sets of lists.
In the list on the right, under the Main Tabs, tick the checkbox next to Developer.
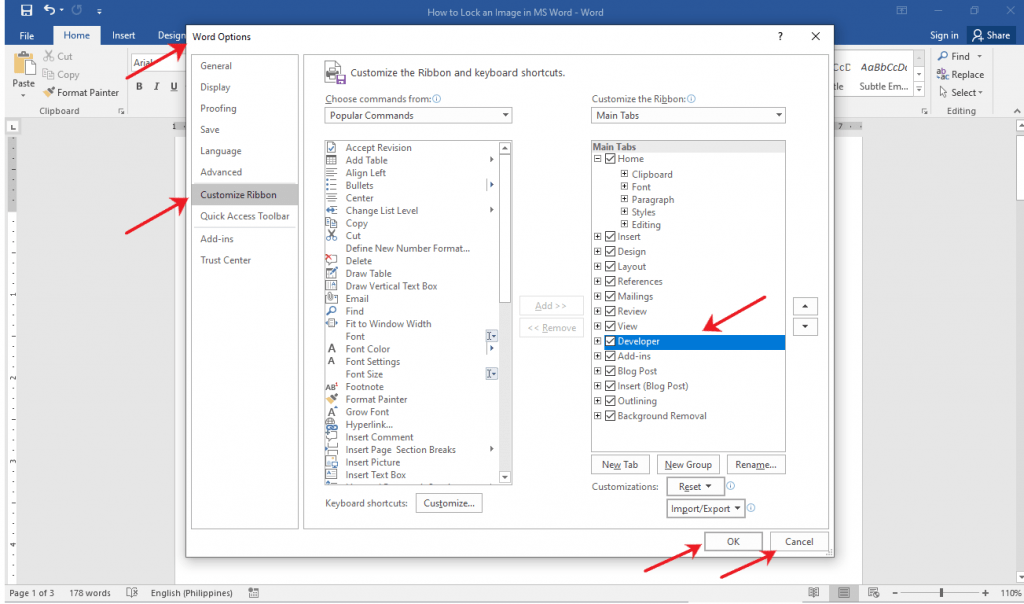
Click on the OK button to save the changes.
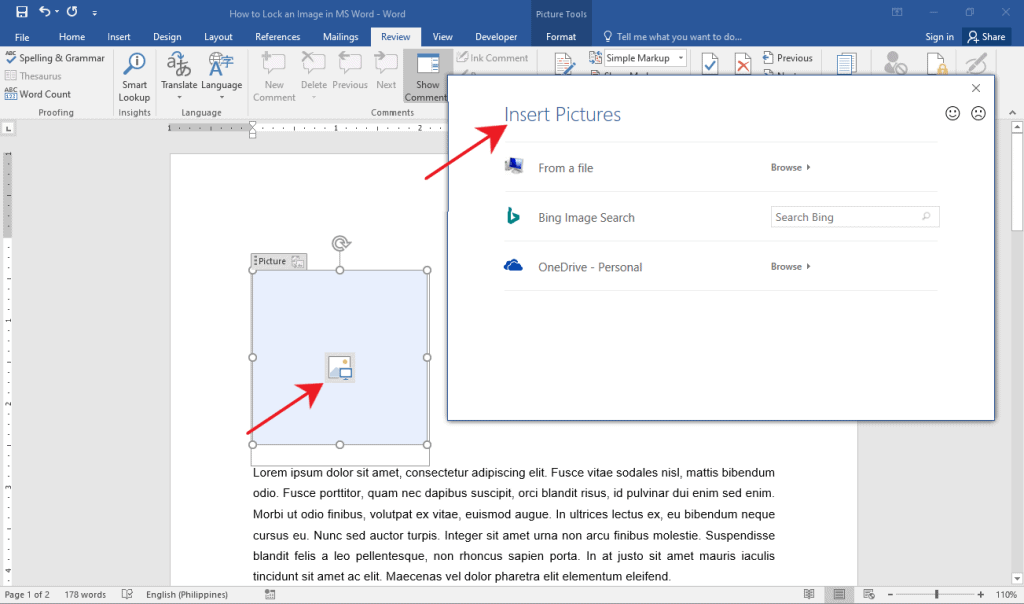
Step 3: Insert Picture Content Control.
Under the Developer tab on the Ribbon, select the Picture Content Control under Controls group.
This will insert a Picture Content Control on whichever location your cursor is located.
Make sure that you place your cursor to where you want the image to be placed.

Step 4: Insert an Image.
Now that you have a Picture Content Control on your document, proceed to insert the image that you want to use. T
o do this, simply click on the picture icon right in the middle of the Picture Content Control.
Doing so will launch the Insert Picture dialog box. This will let you select which location your images will be coming from.
Choose the images you want to use, then click Insert to proceed.
Method 3: Lock an Image Using Restrict Editing Option
The third method will require you to protect your image with a password.
Take note, however, that enabling the Restrict Editing option will lock the document as a whole.
Step 1: Open a Word document.

Step 2: Insert an image.
If you already have a picture loaded on your document, you can skip this step. But if you don’t have one yet, simply follow the steps on how to insert an image in Method 1.
Step 3: Enable Restrict Editing.
Now that you have a picture ready, go to the Review tab and select Restrict Editing.
This will launch the Restrict Editing side panel on the right side of your screen.

Now, click on the Yes, Start Enforcing Protection button found at the bottom of the menu.
This will prompt a dialog box that will require you to set a password for the file.
Type in the password that you prefer, then click OK.

Remember the password that you used so you’ll be able to edit or delete the image later on.
Also, note that enabling Restrict Editing tool will prohibit you to edit the entire document.
Method 4: Lock an Image Using Watermark Tool
If you want to edit your document without the hassle of accidentally dragging your background, then this method is perfect for you.
Here’s how you can do that.
Step 1: Open a Word file.

Step 2: Insert your image as a Watermark
Go to the Design tab and click the Watermark button under the Page Background group.
From the list of options below, select Custom Watermark. This will launch a dialog box.

From there, select Picture Watermark.
Click on the Select Picture button. Doing so will prompt an Insert Picture dialog box.
Locate and import the picture you want to use.

Method 5: Lock an Image Using Fill Effects
This method is another option to stop your image from constantly getting selected while you’re editing text.
Step 1: Open up a Word document.

Step 2: Select fill effects on the page color option.
Go to the Design tab.
Click the Page Color drop-down menu and select Fill Effects. This will prompt a dialog box in the middle of the screen.

On the dialog box, go to the Picture tab and click the Select Picture button.
Locate the image you want to use and then click the OK button.

Method 6: Lock an Image Using Header and Footer
Finally, in this last method, we’ll guide you on how to lock an image using the Header and Footer section. This is especially useful if the image that you want to lock in place are logos for corporate documents.
Here’s how to do just that.
Step 1: Open an MS Word document.

Step 2: Insert your image in the header or footer.
Double-click on the Header or Footer section of your document. The header is the topmost area of the file where the header or title is usually placed.
Meanwhile, the footer section is found at the bottom part of the document, where we usually see page numbers.

Once the Header or Footer section is enabled, the Design tab will be visible on the Ribbon. From there, select the Picture button under the Insert group.
Then, locate and insert the image that you want to use.

Finally, double-click on the gray part of your MS Word window to close the Header and Footer section.

Deleting a Locked Image in MS Word
For the first and second methods, you can simply click on the image and hit the Delete key on your keyboard to delete the image.
Deleting the image you locked using Method 3 won’t be complicated as long as you know the password. You just have to click on the Protect button under the Review tab and select Restrict Editing. It will launch a menu on the side of the screen. From there, just click on Stop Protection and then enter the password you used to enforce protection to the document. After removing the document’s protection, just delete the image by selecting it and pressing the Delete key..
Meanwhile, to delete a watermarked image, simply click on the Watermark button under the Design tab. Then, select the Remove Watermark option. If you used the Fill Effects tool, simply go back to the Page Color option on the Design tab, then select No Color.
Lastly, to remove a locked image in the Header and Footer section, access the Header and Footer section, click the image and press the Delete key on your keyboard.
Conclusion
We hope you found this article helpful!
I was trying to determine how to keep an image from rotating upside down. I am utilizing a snipped image from my medical records. (I changed from Profile to landscape) to allow for more space for the grafts. Everything was going well until the last image which is rotating every time I try to move on to the next page. Suggestions?
Thanks for those suggestions. I was able to use some, but they are not really what I want.
I have a diagram – a family tree – and I want to add a coloured spot and a name label to it for each person on the tree – about 100. I did it once, being very careful and didn’t bother to “group” as I went. However at the last minute things moved, and I saved it though it was wrong, but then deleted by accident, so I have to start again.
I want to be able to lock the basic diagram, so it doesn’t slide as I move the dots and labels tiny bits at a time. Then this time I will “group” as I go.
Or is there another way I can do this project?
Thanks