You may be looking for a way to enhance your PowerPoint slides. One would be adding an eye-catching border to make your slide look refined and spectacular.
Borders also make your slides look more organized. While thin borders give the slide a design appeal, broad or pictorial borders will emphasize its definition.
There are two ways you can add borders to slides:
- Using shapes
- Using online pictures
We will show you both methods using simple, step-wise instructions.
Let us begin.
Method #1: Adding Borders Using Shapes
This method uses simple borders using built-in shapes.
Step #1: Open PowerPoint slide
Open an existing slide or a new slide for adding the border.
For this tutorial, we open a new slide.

Step #2: Go to the Insert Menu
Click on the Insert tab in the top menu bar to change the ribbon.

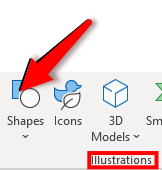
Step #3: Choose a Shape for the Border
In the section Illustrations, click on the Shapes icon.
This opens a menu.
In the Rectangles section, click on a suitable rectangle for creating the border.
We have selected the Rectangle: Rounded Corners shape, you may choose a different shape.

The cursor will change to a cross.
Click the cursor in the top left corner of your intended border.
Drag the handles on the shape and spread it to cover the slide.

Step #4: Format the Shape
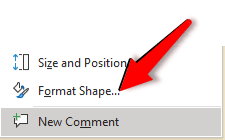
Right-click the shape.
This will open a menu.
Click on the tab Format Shape.
This opens a Format Shape dialog box on the right side of the window.
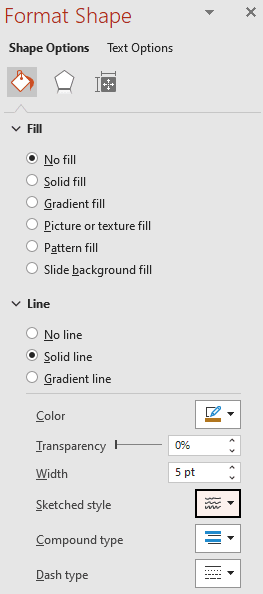
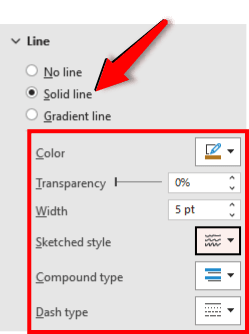
Click on the Fill & Line icon.
In the section Fill, click and select No fill.
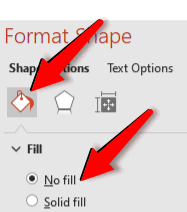
This converts the shape into a border.
In the section Line, click and select Solid line.
- Click on Color to select a proper color for the border.
- Click on Width and select a proper width for the border.
- Click on Sketched style and select a proper border style.
- Click on Compound type to select a compound border.
- Click on Dash style to select the line type.
The final result may look like this:

Method #2: Adding Borders Using Online Pictures
This method uses online pictures to add as borders.
For this method to work, ensure a working internet connection for your computer.
Step #1: Open PowerPoint slide
Open an existing slide or a new slide for adding the border.
For this tutorial, we open a new slide.

Step #2: Go to the Insert Menu
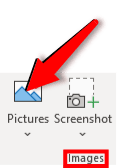
Click on the Insert tab in the top menu bar to change the ribbon.

Step #3: Choose and Insert an Image
In the section Images, click on the Pictures icon.
This will open a drop-down menu.
Click on the tab Online Pictures…
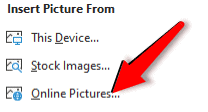
A new window will open for Online Pictures.
In the search bar, type borders and hit the Enter key on your keyboard.

The display will show many border images.
Click and select any border image.

Click on the Insert tab at the bottom of the window.
This will add the border to your slide.
Step #4: Format the Border
Use the handles on the picture to resize it to suit your slide.

Conclusion
We have shown you two methods of adding borders to slides in PowerPoint. Use our methods to enhance your slides in your presentation.