Adding a footer to your PowerPoint presentation can bring several benefits. You can insert references and citations in the footer. You can add some explanatory notes about a topic in the slide. Insert your company motto or disclaimer. You might even put in a joke in the footer if your presentation is of the fun and lightweight type.
The template you are using for your slides may not have footers. But it is easy to add footers at any time. PowerPoint allows you to add footers in your presentation to:
- A single slide
- All slides
- Exclude a slide
- All slides except the title slide
To add a footer and edit its contents, you will need access to Header and Footer menu. We will show you how to access the menu, and add the footer in simple steps.
Let’s begin.
Step #1: Open Your Presentation
Open the presentation where you would like to add footnotes.
Go to the slide where you want to start adding the footnote.

Step #2: Go to the Header and Footer Menu
Click on the Insert tab on the top menu bar to change the ribbon.

In the section Text, click on the Header & Footer icon.

A Header and Footer dialog box will open.
Click on the Slide tab.
Under Include on slide, click on Footer and ensure there is a tick-mark in the box on the left.
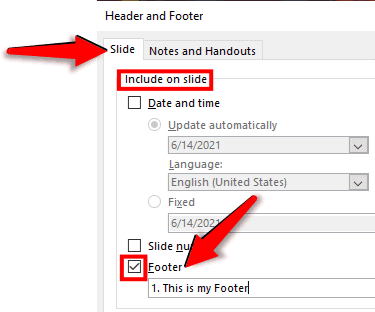
Step #3: Fill in your Footer
Click inside the text box under Footer and type the text you want to display in the footer.
1. If you want to show the footer in this slide alone, click on Apply to exit the dialog.
2. If you want to show the footer in all slides but not the current, click on Don’t show on this slide. Click on Apply to All to exit the dialog
3. If you want to apply the footer to all slides, click on Apply to All to exit the dialog.

PowerPoint will add the footer at the bottom of the slide, according to your selection.

Conclusion
Follow our step-wise instructions above. You can easily add a footer to any or all slides in your presentation.