In this tutorial we will discuss 2 methods for adding columns to an existing word table.
2 Ways to Add Columns to a Table in MS Word
- Using the Context Menu upon right-clicking.
- Using the Layout Tab under the Table Tools section.
In this tutorial we will discuss 2 methods for adding columns to an existing word table.
In this article I will outline multiple steps for creating tables in MS Word.

In this tutorial, I will share a couple of methods to delete rows in MS Word Document.
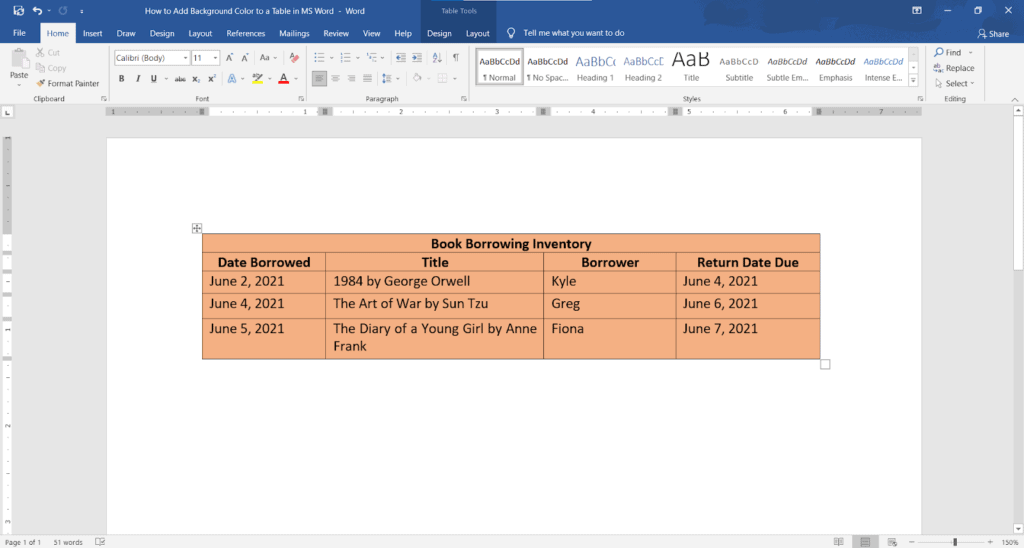
In this post , we will share a couple of methods for adding background color to MS Word table.
In this tutorial , we will discuss 2 methods to change table border color of a word document.

The Internet has many images that you can use in your PowerPoint presentation. Some images are copyright, and you can use them only with the authors’ permission.
You may be using an image in your presentation with or without permission. As a basic courtesy, you must cite the source of your image. In some cases, citing the source is a necessity also. According to some copyrighting laws, you must cite images in specific ways.
In general, citing an image requires mentioning the source of the image and the author’s name. In academic settings, the citation may have to follow a formal style, like APA, MLA, or Chicago. You may have to refer to the specific style guidelines to know the method you have to follow.
The actual process of citing pictures and images in PowerPoint is quite a simple process. We will show you the process in a few simple steps.
Let’s begin.
Google Docs allows you to conveniently create, edit and delete tables. In this article, we will be talking about how to delete tables.
Deleting a table is just one way to remove a table in your Google Docs document. Another way of removing a table is by cutting it. When you cut a table, it is removed from your document. You can then paste the table in another location in your document or in another document altogether. We will be talking about both of these ways of removing a table from your Google Docs document.
In Google Docs, there are multiple ways of doing the same thing.
With that introduction, let’s learn the five methods.
You can easily insert and edit tables in Google Docs. One of the best things about Google Docs is that it gives you various options for formatting your tables. You can change everything from the number of columns to the border colors of the table. In this article, we will be focusing on how to change the heights of the rows of tables in Google Docs.
You might want to have different row heights for different rows of your table. For example, you might want the height of the first row (the heading row) to be higher than the height of the other rows. This allows you to use a bigger font size for the text in the cells of the first row.
Another great thing about Google Docs is that it gives you multiple ways of doing the same thing.
With that introduction, let’s learn the steps for customizing row height.
In this article, we will focus on changing the alignment of a table. We will specifically be talking about how to center align a table in Google Docs.
Changing the alignment of the table does not change the alignment of text inside the table. We will cover it in the second part of this article.
Sometimes, you may need to save PowerPoint slides as images. The requirement may be for saving only one slide as an image or saving all the slides as different images. PowerPoint allows you to do this, and you only have to follow our stepwise method.
Let us start.